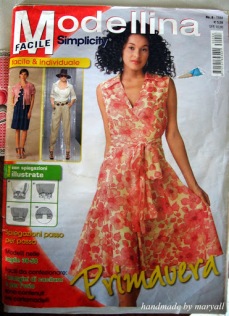
Well, I showed you my daughter’s dress for the baptism we attended last month. For my dress, I chose a pattern from a magazine called “Modellina Facile Simplicity”, 8/2013, n. 54 (the magazine actually contains Simplicity and New Look patterns, and for 5,90€, I get around 15 patterns! Not bad, right? 😉 )
Here’s my dress:
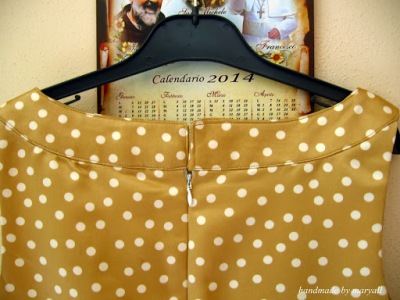
I had very little time to sew this, so I ended up making a very quick muslin for the bodice. It seemed ok, so I cut into my nice fabric, sewed the bodice, tried it on for the first fit, and it seemed well again, continued sewing, and right after adding the centered zipper, tried it on again and…. disaster! It was HUGE all around me!!! The party was on Sunday morning, and I did my second fit on Friday night at 2 a.m. I was desperate! In the morning, we went to the hairdresser’s and… lost 6 hours just queing! Saturday afternoon I had to think of a plan B outfit, and tried one that I already had, but it was a bit too tight around my hips, so I decided to give it a try and adjust my dress. So, I unpicked the zipper and the neckline band, shortened the latter at the smallest size and sew it again. The error was actually not understanding that there is NO shoulder seam – the neckline forms it. When fitting, and for the muslin, I didn’t finish the bodice because I didn’t have time, so I just sewed the bodice at the shoulders, thus liftening the entire bodice, hence a different fit. That’s why, when adjusting the dress, shortening the neckline lifted the bodice and adjusted the fit around my bust.
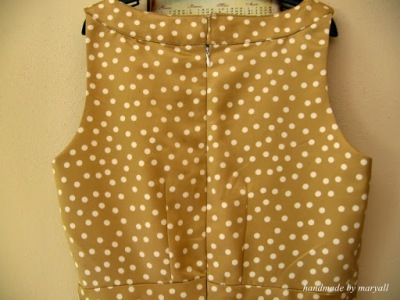
I then took in the back at the center seam by 3 cm on each side (a bit more than 2″), and inserted the only invisible zipper that I had and that matched the colours – a white one, but 6 cm (a bit more than 2 inches) shorter than I needed!! Don’t ask me how I got in and out of that dress…. it’s a Candid camera thing 😀 .
Pattern Description:
Misses Dresses and Jacket (I made view B)
Pattern Sizing:
8-18
Did it look like the photo/drawing on the pattern envelope once you were done sewing with it?
It would have, if I hadn’t modified it.
Were the instructions easy to follow?
Yes, but I wish they would have mentioned somewhere that there is no shoulder seam, and the neckline forms the shoulder.
What did you particularly like or dislike about the pattern?
I like the final fit I achieved in the bodice, and its ’50s inspired look – so feminine!
Fabric Used:
Some kind of medium weight satin cotton with some stretch – it frayed worse than the rayon lining!
Pattern alterations or any design changes you made:
I’m referring to the sizes in my magazine: cut the medium size at the bust, tapering to the largest at the waist. Cut the neckline in the smallest size. Raised the bodice by 1,5 cm. For a more fitted bodice, I took in the back for 3 cm (about 2″1/8) along the zipper. Drafted a semi-circle skirt instead of the gathered one. Put in a hook-and-eye closure instead of the two buttons at the back neckline. Finished the hem with white bias binding and invisible hand-stitching.
Would you sew it again? Would you recommend it to others?
Yes! And yes! It’s a great dress!
Conclusion:
I really enjoyed all the process, although it’s not nice having a short timeline. And then, just 30 hours before I needed it (for my nephiew’s baptism ceremony), at my second fit, it was just HUGE. There was something wrong with the sizing in the magazine. Luckily, I could figure out the alterations by myself (first time sewing a dress for myself!), and was able to finish it just 5 hours before leaving home, at 3 a.m.! 😀 I wish I had more time, and finish sewing the outfit as I had imagined it (with a pettycoat and a jacket). Anyway, I felt great in it, and still received a lot of compliments! 🙂
Versione italiana:
Vi avevo fatto vedere il vestito di mia figlia che avevo fatto per il battesimo al quale siamo stati il mese scorso. Per il mio vestito, ho scelto il modello 54 di Modellina Facile Simplicity n. 8/2013 (la rivista contiene cartamodelli New Look e Simplicity, e per 5,90€ si hanno circa 15 cartamodelli – mica male, eh?)
Ho avuto poco tempo per cucire questo vestito, quindi ho fatto velocemente una tela di prova. Sembrava ok, e sono andata avanti a tagliare la mia stoffina, ho cucito il corpetto, e l’ho provato – ancora tutto ok, quindi ho proseguito. Dopo aver cucito anche la chiusura a zip, l’ho riprovato e… disastro!!! Mi stava ENORME dappertutto! La festa era domenica mattina, e la seconda prova è stata fatta alle due del mattino di sabato… Ero disperata! La mattina siamo andate dalla parrucchiera, ed abbiamo perso 6 ore per la fila! Sabato pomeriggio ho pensato ad un piano B per il vestito da indossare, ed ho misurato uno che avevo già, ma mi stava stretto attorno i fianchi, quindi ho deciso di provare ad aggiustare il vestito. Ho scucito la cerniera, e la banda che forma lo scollo, ho accorciato quest’ultima di due taglie, e l’ho ricucita. L’errore era stato quello di non capire che le spalle non si cuciono assieme, ma che la banda che forma lo scollo, una volta attaccata al corpetto, formava le spalline. Quando ho fatto le prove, non avevo cucito questa banda, ma il corpetto ai lati che mi sembravano le spalline, alzando così il corpetto e creando una vestibilità diversa. Ecco perché, quando ho fatto le modifiche, accorciare la banda ha alzato il corpetto ed ha aggiustato la vestibilità.
Ho anche tolto 3 cm di ciascun lato della cucitura centrale dietro, ed inserito una cerniera invisibile, l’unica che avevo e che andava bene, ma di 6 cm più corta!! Non chiedetemi come sono entrata ed uscita da quel vestito – è una cosa da Camera Nascosta!! 🙂
Mi sono sentita benissimo con questo vestito addosso, e ne farò sicuramente qualcun’altro per la prossima estate!
This post is also linked at: Make it wear it


This.Is.GORGEOUS! You did such a phenomenal job! The lining is incredible, and the whole thing fits you like a dream! I hope you do make a million more, it’s perfect for you!
LikeLiked by 1 person
Thanks! 🙂
LikeLike